Visit the Shop! Meet Little Mo & Friends About the Artist

Archive for the ‘Little Mo and Friends Shop’ Category

The party is starting!

Friday, August 28th, 2009

Get ready for lots of new Mo collection coming soon in my stationery shop! When I think of parties, I think of cakes and colourful banners! So to start off the celebration, I want to show you my Mo Buntings!

Happyparty

I actually made these for Sunday Best, to dress up my stall…but then I thought they were so cute and I was really happy with them. So I printed a few extra sets and packaged them nicely in little packets. You can get my Play Time banners and my Garden Friends banner from my shop.

mo buntings

You can also get them with my limited edition Love Hate Zine pack. The zine has quirky Love / Hate illustrations by me and my Aussie illustrator friends! We call ourselves the Six South! I love the name. It reminds me of my favourite book South of the Border, West of the Sun.

LoveHate zine

I only have a few of these banners and zines, so enjoy them! And may you have a happy festive celebration in your home!

Dress up for Sunday Best

Saturday, August 22nd, 2009

2 more weeks to go for Sunday Best by Unwrapped.

Sunday Best

Sunday 6 September 2009
11am – 4pm
Perth Institute of Contemporary Arts
(PICA)
Perth Cultural Centre, James Street, Northbridge

Little Mo and Friends is thrilled to be a part of the great line up of designers selling at the 2009 Perth Fashion Festival. There will be new mo products too! Are you excited?

When I think of Sunday Best, I remember my grandmother nagging me to dress my best for Sunday school. And although I was quite a tom boy then and wore mostly jeans and tee I did try! I made sure I scrubbed my face clean and combed my hair..hehe!

So for good times, I will make an effort to dress up my Little Mo stall for Sunday Best and make it twice the fun and colour! Yahhh! Come down and visit me, check out my new mo stationery and all the other cool stalls and their handmade wares!

Thanks for supporting handmade art!

Works in progress

Thursday, August 13th, 2009

funtimes wip

This is my latest artwork of Little Mo swimming under the Maple trees. I’ve called it fun times because it reminds me of those wonderful carefree moments when one is enjoying a splash on a fine day. Especially at the end of summer, when the leaves are turning golden and brown, and the sun rays are still warm and long.

I’ll be using this illustration for a new set of greeting cards available in my shop soon. And I will also be using this piece for my 2010 calendars (which will include other Little Mo settings). I’m excited about the Mo calendars and I hope it will look like a picture book when it is all printed out, ready to keep or hang in the room!

DIY recycled gift boxes

Thursday, August 6th, 2009

origamitree

Lots of people asks how I make my origami display tree. I make all my origami using my recycled wrapping paper. You can get them from my shop in a set or individually. Today I am going to show you how to make a cute gift box.

Box1

You will need to cut a square sheet of wrapping paper. The bone folder is optional (I use it to press down my paper/ creases firmly, you can use a ruler or your fingers).

Box2

Flip the paper over so that you start with the white backing. Fold paper twice so that you have these lines.

Box3

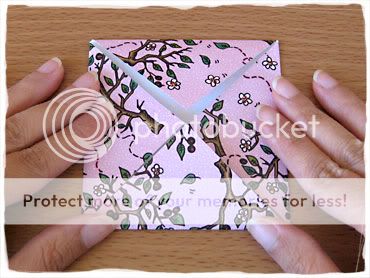
Using the 4 lines as a guide, take each corner and fold into the centre.

Box4

When all 4 corners touch, it will look like this.

Box5

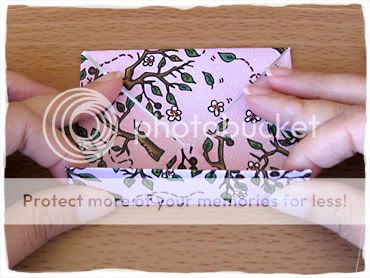
Now take bottom edge of the paper and fold into the centre.

Box7

Do the same with the top edge. It will look like this..

Box8

When your top and bottom is folded. Fold your left and right sides in the same manner as above.

Box9

When you open up your paper, it should have all these creases. Don’t panic, this is good!

Box10

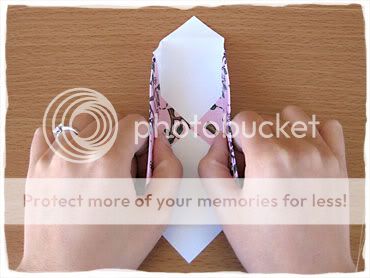
These creases will guide you into folding a box (that’s why it’s important to press firmly when you are folding the paper because it helps!)

Box11

Keep folding.
Box12

Box13

Getting there!

Box14

Yaay you have a box! You can fill it with candies, loose change, buttons etc. To make a lid, just repeat all the instructions above BUT use a slightly bigger square piece of paper, at least 0.5cm larger. This is to enable the lid to slip on and off easily.

Box15

For pretty packaing, I used a strip of coloured paper and some silver strings. I think lace, rik raks and vintage paper would be lovely too.

With this tutorial, you can make ANY size boxes, it all depends on how big your square pieces of paper are! Large squares make large boxes, and small squares make small boxes! Have fun!

Made On The Left

Friday, July 31st, 2009

Made On The Left was super awesome!

Little Mo and Friends booth

I love seeing new faces and returning customers. Some customers are shy, so I always tell them to go ahead and pick up stuff and look around. Because I like doing that myself when I shop. My paper dolls and my mo bags were my best seller. I wasn’t expecting that as they my newest creations so I am grateful for such a positive response. Even granny bought a mo bag! So granny if you read this, you rock! You are going to look cooler than any grannies out there who carries a plain green woolworth’s bag. Hehe.

One memorable highlight for me were all the kids crowding around my table for a paper doll. It made me so excited. One girl was crying for a Spring Love doll because her poor parents were busy looking at other things. Needless to say, they bought two sets, one for her and one for her bigger sister. And they also went home with some Mo stickers. They even stuck them to their clothes (I think my heart fluttered a bit). I must remember to take pictures of kiddies holding their Mo dolls next time!

Some pictures of my stall.

Little Mo and Friends booth2

And some of my neighbours. Tea for bini sells contemporary canvas artwork, which looks great on any blank walls!
Tea for bini

My friend Annie from 17threads who runs the Catalyst workshops has an awesome display and she always does well at craft shows! So height really makes a difference!

17threads

I will post more pictures up in my next post and some goodies that I purchased too.

Thank you postman!

Tuesday, July 28th, 2009

Mail love

Super busy weekend! After finishing Made On The Left I had to get my act together and package up all my online shop orders. I had a little Christmas In July sale this weekend and all these Mo goodies have been packaged up to go to good homes! Thank you so much for buying my art. I hope you love your gifts as I must as I loved drawing and making them for you!

Santa stamp

I even took out my good old santa rubber stamp for that special occasion hehe. I can’t wait to use it again for REAL christmas. And then of course I used my new Mo bags to carry all the goodies to the post office. I think I was so pleased with myself I actually had a big grin on my face the whole time!

Mo goodies

I will blog about my market in another post. Hopefully soon! Tomorrow we are flying up to Geraldton to do some filming for work, so we have to get things organised first. Stay tuned!

New illustrations!

Thursday, July 23rd, 2009

Ok some new things that I have finished illustrating and creating!

New Mo bags! Get yourself a Mo bag yo! These are all screen printed in chocolate brown ink, Little Mo and Patch are tossing paper planes in the air!

Mo bags

And my new kitty tags! These come sealed in a cute pack, in 5 assorted designs. For 5 wonderful presents! Or if they are too precious to give away, you can hang them in your room:) Hehe.

kitty tags

Super round cutter

Thursday, July 16th, 2009

I can’t sew so I don’t have any super sewing machines on my work desk, not like my talented friends, Penny and Franz!

super round machine

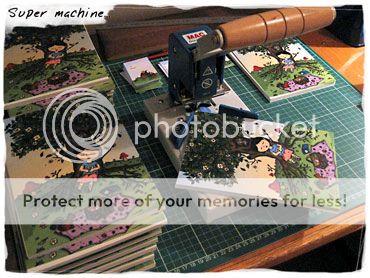
But I have this industrial round cutter and it’s one of the best things I’ve bought for my business. I use it to round all the edges of my notebooks and postcards. And it’s great because you can do a stack in one go. I highly recommend it if you like ’rounding off’ things!

I am working late at night, making more Picnic slumber notebooks for Made On the Left. First I trim the covers to fit the inner pages, then round the edges and then bind them. Then I make labels to wrap around the book and pack them into a cello sleeve. This is what handmade is all about. 100% sweat and tears from me!

This is my second batch of Picnic slumber books as I sold out at Fremantle Market a couple of weeks ago. So if you’re in the neighbourhood, drop by Hyde Park Hotel on 25th July and 26th July for Made On the Left, 10am – 4pm. Lots of Perth designers and artists will be selling their handmade goods and there’s me of course! And these books yo!

Works in progress

Tuesday, July 7th, 2009

I am working on my gift tag range. Similar to my nuts about you gift tags. I think I will stock some printed ones in my shop.

This is what I am working on right now. A kitty cat in a gift box, dreaming of a nice fish bone. (I’m assuming cats dream about their food) I know I do.
purrfect sketches

purrfect wip

About my work process, I do my line drawings in one of my drawing notebooks and scan the artwork in. Then I colour my artwork in on the computer. It takes me awhile to clean up all the black lines (because they tend to be quite messy and sketchy, with rubber marks on them).

Look out for these next week, they’ll be ready in little bags with good old fashion twine for tying up!

Little Mo dolls in 4 seasons

Friday, July 3rd, 2009

Little Mo 4 season dolls

I’ve finally finished my full set of Little Mo paper dolls in 4 seasons! You can choose from Spring Love, Summer Fun, Autumn Magic and Winter Holiday.

I printed small runs of these paper dolls to keep them exclusive and unique. I hope they will add some fun into your Christmas stocking stuffers:)

Next up on my list of things to print some mini gift tags and then I will work on ‘bigger’ things. Stay tuned for works in progress photos!

Related Posts Plugin for WordPress, Blogger...